Auto Scaled
Kasm Workspaces can auto-scale VMs in supported Cloud Providers/Hypervisors. The VM Provider documentation provides a referece for the individual fields of each supported cloud provider/hypervisor. This document will focus on the Windows specific implications of each environment, since each cloud environment has different idiosyncrasies.
Servers auto-scaled by Kasm should be seen as individual servers connected to via RDP. Kasm Workspaces provides session handling and ensures users a distributed to the pool of servers. Kasm auto-scaling is not supported as a way to scale RDS deployments.
Important
AutoScaling is available in the Community and Enterprise editions only.
Auto Scaling Pool
Before you can create an auto-scaling configuration, you need to create a Pool that will be the target of the auto-scaling. A pool can have multiple auto-scaling configurations, allowing you to, for example, auto scale servers in Azure and AWS and have the VMs be part of the same pool that users will get assigned to. A more typical scenario, however, is to create one pool per Cloud environment, per region.
To create a Pool, in the Admin Dashboard go to Infrastructure, Pools, and click the Add button on the Pool list.
Provide a Name
Select
Serveras the TypePress Save
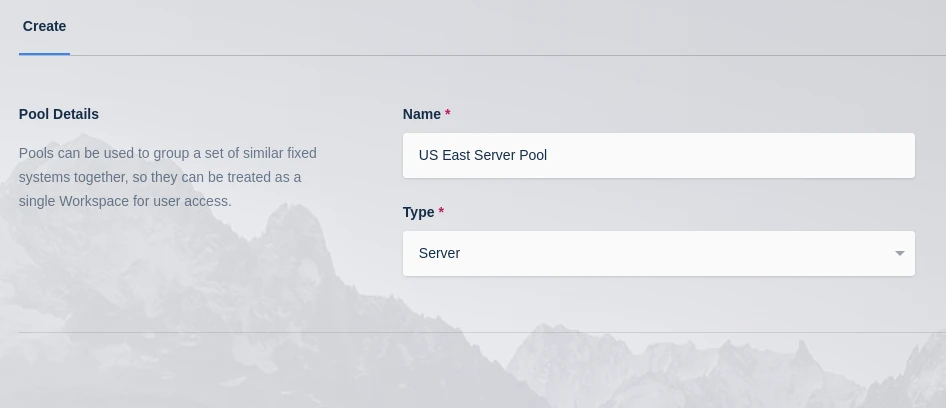
Create Server Pool
Auto Scale Configuration
Auto-Scale configurations have two parts, the AutoScale Details and the VM Provider Details. The AutoScale details are common to any cloud provider/hypervisor.
To create an auto-scale configuration…
Navigate to Infrastructure->Pools
From the Pool list, click the arrow icon next to the desired pool and click Edit
Scroll to the bottom of the Pool Configuration page to the AutoScale Configuration list and click the Add button.
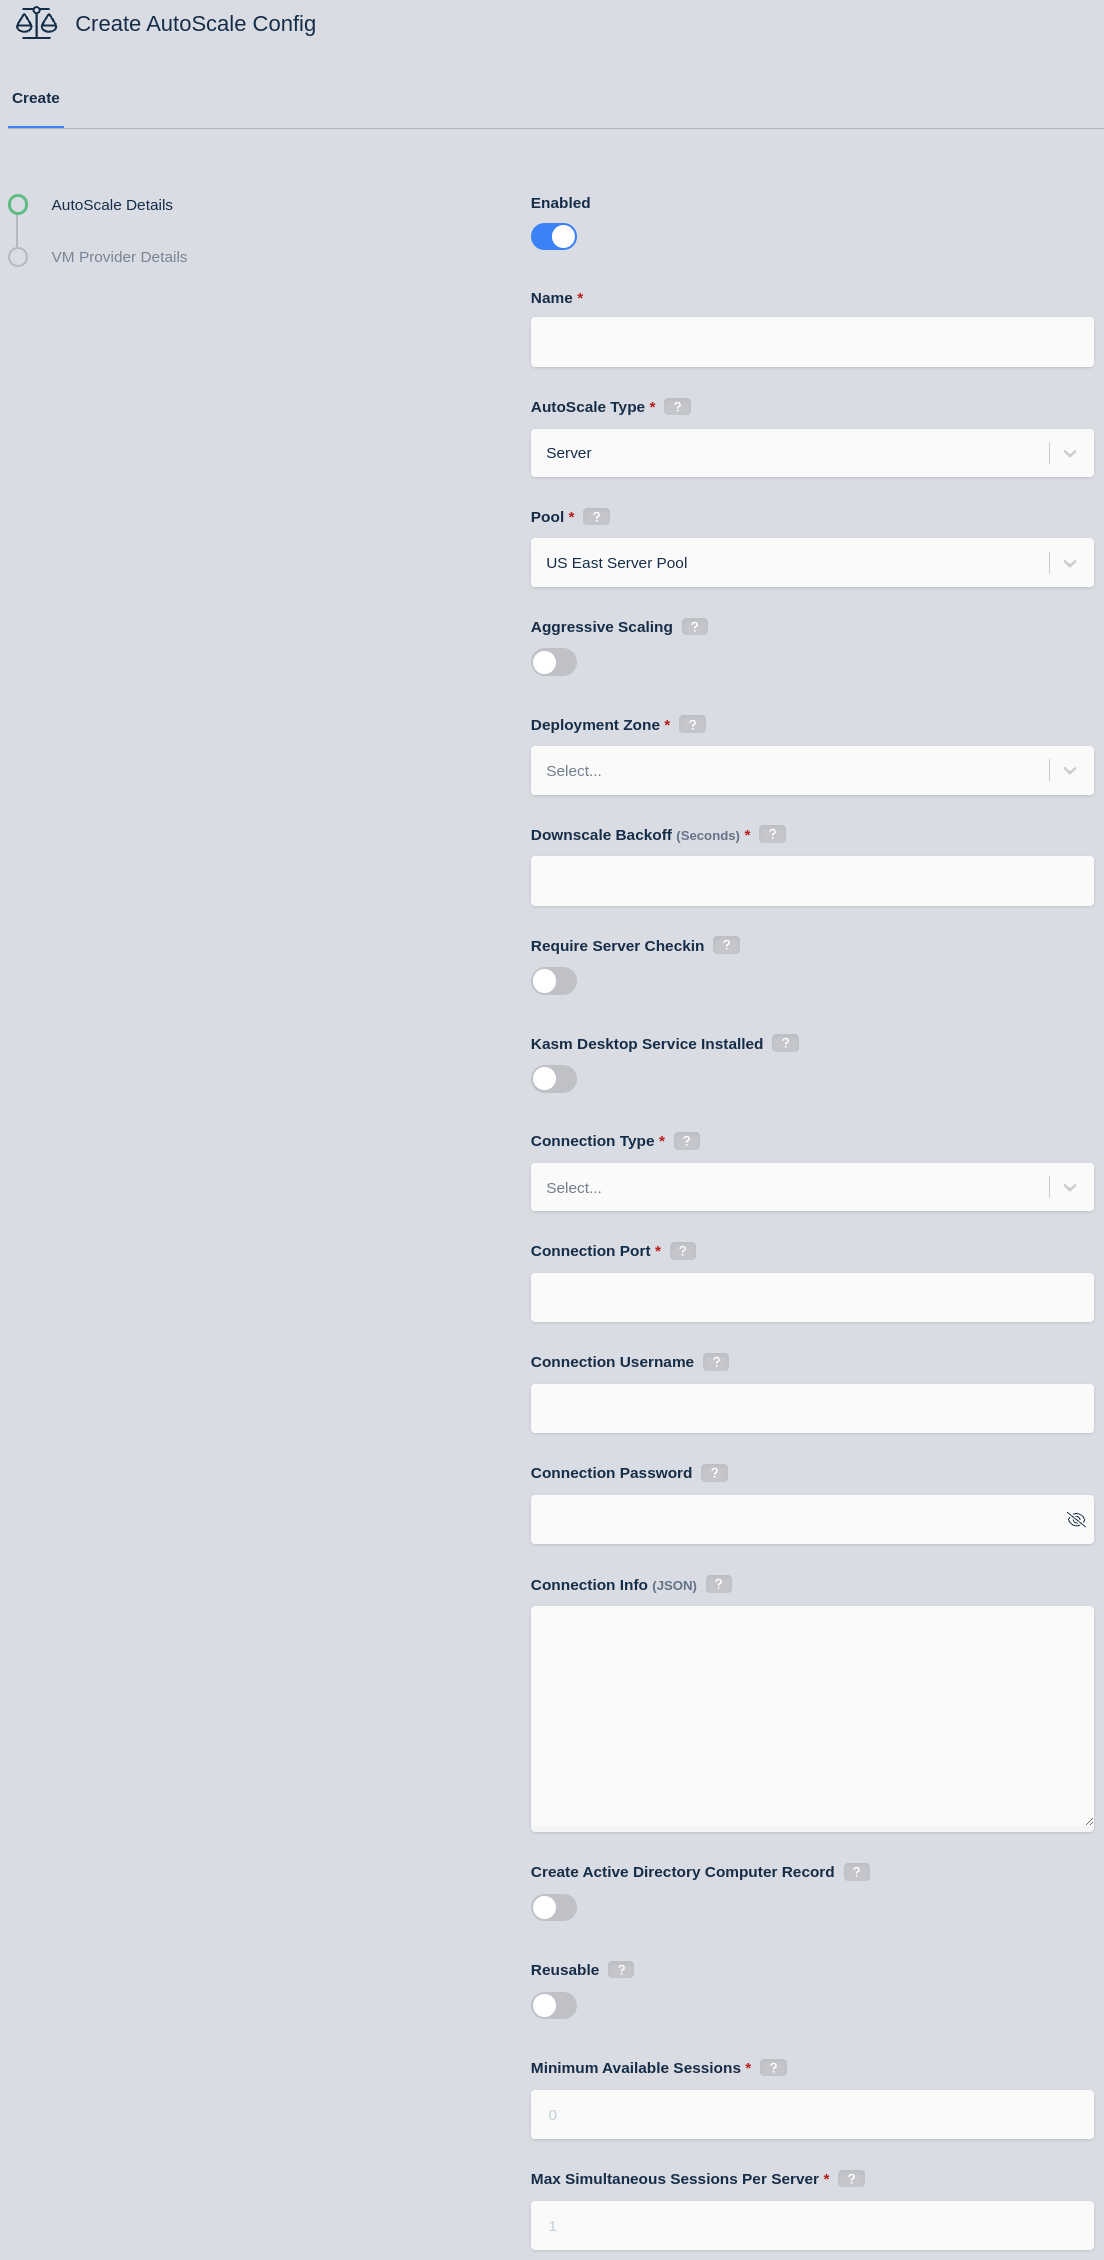
Create Autoscaling Config
Enter a Name
Check the Enabled box
Select the Deployment Zone, by default there is a single zone called
default.Select RDP as the connection type.
Enter the Connection Port, RDP uses port 3389 by default.
Enter an appropriate value for the username and password fields. See the Windows Authentication documentation for guidance.
The connection info can be left empty, unless you are using RemoteApp.
If desired, check the Create Active Directory Computer Record. See the Auto-Join Active Directory guide for more details.
Check the reusable box if you want VMs to be re-used after a user terminates their session. For privacy reasons, servers should only be reusable if single sign-on is configured. See the Windows Authentication documentation for guidance on SSO.
Set a desired Minimum Available Sessions, this is the number of available sessions you want at all times. For example, if each server could support up to 4 concurrent sessions and you set Minimum Available Sessions to 10, Kasm would ensure that across all servers there are at least 10 open sessions available. As soon as the number of available sessions drops below this number, additional VMs will be provisioned.
Set the Max Simultaneous Sessions Per Server to the desired limit. Note that you must be using a version of Windows that supports multiple concurrent RDP sessions in order to set the number to greater than 1. Kasm will ensure each server will only be assigned this maximum number of current user sessions.
VM Providers
The next page in the auto-scale configuration is the VM Provider Configuration, which is specific to the Cloud Service Provider or Hypervisor you are targeting.
VM Startup Scripts
Each VM Provider has special caveats around how their startup scripts are handled, see the VM Provider page for your target environment for more details. While each VM Provider may behave a bit differently or expect a slightly different format, they all support PowerShell scripts and that script will have access to Kasm managed variables. The following table lists variables that are accessible from the startup PowerShell script.
Startup Script Variables
Variable Name |
Description |
|---|---|
connection_username |
If the auto-scale configuration is set to use a static username for Kasm user sessions, the username will be contained in this variable. |
connection_password |
If the auto-scale configuration is set to use a static password for Kasm user sessions, this variable will contain the password. |
ad_join_credential |
If the auto-scale configuration is set to join the VM to an Active Directory domain, Kasm creates the AD record and sets a random password that can only be used for joining the VM to the domain. This can then be used in a Powershell startup script to complete the process of joining the system to the domain. |
domain |
If the auto-scale configuration is set to join the VM to an Active Directory domain, this variable will contain the name of the domain. |
Important
If your script uses curly brackets, aside from Kasm variables, you must escape them by doubling them up. Here is an example.
$joinCred = New-Object pscredential -ArgumentList ([pscustomobject]@{{ UserName = $null; Password = (ConvertTo-SecureString -String '{ad_join_credential}' -AsPlainText -Force)[0] }})
Add-Computer -Domain "{domain}" -Options UnsecuredJoin,PasswordPass -Credential $joinCred -Force -Restart
In this example, curly open and closing brackets that are not in reference to Kasm variables, are doubled up. This example joins the system to the domain, using the ad_join_credential and domain variables that are provided by Kasm.
Auto Join Active Directory
Auto-scaled servers can be configured to automatically join active directory. This is a two step process which involves Kasm first creating a Computer Object in Active Directory, within a specified AD container. When the Computer Object is created, a random single use password is created, which can only be used to join the computer to the domain. The final step of joining the computer to the domain must be done from the Windows server itself. This is facilitated through the startup script of the VM Provider configuration. The Powershell startup script will join the computer to the domain using the single use random password that was created by Kasm.
Create an LDAP Configuration that will be used for user authentication to Kasm.
Create an LDAP Configuration, that will be used to create computer objects in AD. The service account used by this LDAP configuration must have permissions to create and remove computers from the domain. You can use the same LDAP configuration that is used to authenticate users or you can create a different LDAP configuration used specifically for joining and removing systems. If you use a separate LDAP configuration, leave it disabled so that it cannot be used for authentication purposes.
In the Auto-scale Configuration, select SSO User Accounts for the Connection Credential Type.
In the Auto-scale Configuration, check the Create Active Directory Computer Record box.
In the LDAP Config select the LDAP configuration created in step 2.
In the Active Directory Computer OU DN, enter the AD OU Distinguished Name. Example: OU=Computers,DC=example,DC=local
Enable Recursively Cleanup Active Directory Computer Record if you anticipate the Computer objects having child objects. This can prevent
notAllowedOnNonLeaferrors when cleaning Azure VMs.Click Next to save the auto-scale configuration.
The next page is the VM Provider configuration. Scroll down to the startup script. See the example in the VM Startup Script, which is a Powershell script that will add the VM to the domain specified by the LDAP configuration. Each VM Provider has different caveats for script formats and execution, see the VM Provider page for the environment you are in.
Workspace
To provide users access to the auto-scaled server pool, you must create a Workspaces.
Navigate to Worksapces -> Workspaces
Click the Add Workspace button at the top of the Workspaces list.
Select
Poolfrom the Workspace Type.Provide a Friendly Name and Description.
Check the Enable box.
In the Pool drop down, select the Pool you created earlier.
In the RDP Client Options dropdown, select one of:
Web native client to access the Windows instance using Kasm’s in browser access method.
RDP local client to access the Windows instance using the client endpoint’s RDP think client software authenticated through the Kasm RDP gateway.
Click Save.
You should now see the Workspaces on the user dashboard.