SAML 2.0 Authentication
Kasm offers SAML configurations for authorization through SAML 2.0 Identity Providers. This gives users a single sign on experience and improves security.
Configuration
Saml configuration can be found under the Authentication tab in the Admin Navigation Bar.
Service Provider
We automatically generate the Service Provider Entity ID, single login url and single logout URL when you submit a configuration as this is based on the hostname of your server.
Enabled
This checkbox will enable this configuration and determines wether it will be seen by the users as an option in the login page.
Display Name
This is the name shown to the users in a login button on the login page. e.g. ‘OneLogin’, ‘Okta’
Host Name
The URL hostname (e.g kasm.example.com) of the deployment. This SAML config will only function when the deployment is accessed via this URL host name. This allows for a single deployment to service multiple tenants who may need different SAML configurations. If Default is defined, this config will apply regardless of the host name.
Entity ID
This is the URL that identifies the Service Provider. It may be called a Provider Issuer or something similar. The URL is automatically created by Kasm for this configurations sign on.
Single Sign On Service
This is the URL used for the response from the Idp to login. The URL is automatically created by Kasm to connect to the specific configuration.
Single Logout Service
This is the URL provided for the logout of the user. It may be provided by the IDP but is not required
Relay State
The Relay state must be set to https://hostname/#/sso
Default
Used in conjunction with Host Name. When checked this config will apply regardless of what Host name the user is accessing the server with.
Auto Login
This setting will automatically launch this saml configuration from the default login page. Only one configuration should be set to auto login. If this is set the normal login page may still be accessed at /#/staticlogin
Group Member Attribute
This setting maps the attribute from the Idp to the Kasm group. The group must be enabled for kasm and given the name under the individual group edit.
NameID
This attribute is used as the identifier for the user. The Idp may specify it is set to “emailAddress” or something similar but it may also be blank.
ADFS
if using Active Directory Federation Services select this checkbox
x509 Certificate
This is an Optional Certificate that can be provided for signature verification of the SP
Private Key
This will be generated along with the optional x509 certificate above
Debug
This will enable the response to show the specific saml error that is occuring. It is useful during setup of the configuration.
Identity Provider
Entity ID *Required
This is the URL provided by the IDP that identifies the provider. It may be called a Provider Issuer or something similar. This URL must be configured for the Login to work properly.
SingleSignOnService/SAML 2.0 Endpoint *Required
This is the URL provided by the IDP used for the login. This URL must be configured for the Login to work properly.
SingleLogoutService/SLO Endpoint
This is the URL provided for the logout of the user. It may be provided by the IDP but is not required
x509 Certificate
This is the certificate used to verify the signature of the application and it is required.
Attributes
One attribute must be provided by the IDP. It should be a unique identifier like username or email
Advanced Settings
These options can be configured to meet the security requirements needed.
Want Attribute Statement
Indicates a requirement for the AttributeStatement element
Send Requested Authn Context
Send the optional RequestedAuthnContext element in the SAML request. Certain IDPs will not work properly when this field is sent in the request.
Name Id Encrypted
Indicates that the nameID of the <samlp:logoutRequest> sent by this SP will be encrypted.
Authn Requests Signed
Indicates whether the <samlp:AuthnRequest> messages sent by this SP will be signed.(Metadata of the SP will offer this info)
Logout Request Signed
Indicates whether the <samlp:logoutRequest> messages sent by this SP will be signed
Logout Response Signed
Indicates whether the <samlp:logoutResponse> messages sent by this SP will be signed.
Want Messages Signed
Indicates a requirement for the <samlp:Response>, <samlp:LogoutRequest> and <samlp:LogoutResponse> elements received by this SP to be signed.
Want Assertions Signed
Indicates a requirement for the <saml:Assertion> elements received by this SP to be signed.(Metadata of the SP will offer this info)
Want Assertions Encrypted
Indicates a requirement for the <saml:Assertion> elements received by this SP to be encrypted.
Want Name Id
Indicates a requirement for the NameID element on the SAMLResponse received by this SP to be present.
Want Name Id Encrypted
Indicates a requirement for the NameID received by this SP to be encrypted.
Signature Algorithm
Algorithm that the toolkit will use on signing process.
Digest Algorithm
Algorithm that the toolkit will use on digest process.
SAML Setup
For general SAML configuration:
Copy the Service Provider Entity ID, Single Sign On, (optionally) Single Logout Service to the Identity Provider.
Note
if the single logout service field is left blank then there will be no logout redirection on users logout.
The Identity Provider must also be given the Relay State provided
a NameID attribute must be set to return the specific attribute of the user. (e.g. ‘emailAddress’, ‘transient’) A default of Unspecified is used when not present.
The Identity Provider should then return these same settings to be put under the Identity Provider section in the configuration settings.
The metadata button should return the Service Provider information.
Some of the specific IDP setups below may help in setting up SAML as they are sometimes similar
Note
A non redirecting login page is at https://hostname/#/staticlogin when auto login is enabled.
Group Assignment
Groups for SAML users are automatically assigned if group has a SSO Group Mapping for this saml IDP and SAML group name. This will allow automatic provisioning of groups to SAML users but will not unassign non-SAML groups.
To automatically assign groups to saml users:
Navigate to the Access Management -> Groups tab in the admin navigation bar
Select edit for the desired group using the arrow
Select the SSO Group Mappings tab and select Add SSO Mapping
Select the SAML provider to be mapped to this Kasm group
There are two options for specifying with SAML users to assign to this Kasm group
Check the Assign All Users checkbox to assign all users from this SAML IDP to this Kasm group irrespective the users IDP groups
Enter Group Attributes as the name the IDP has for this group
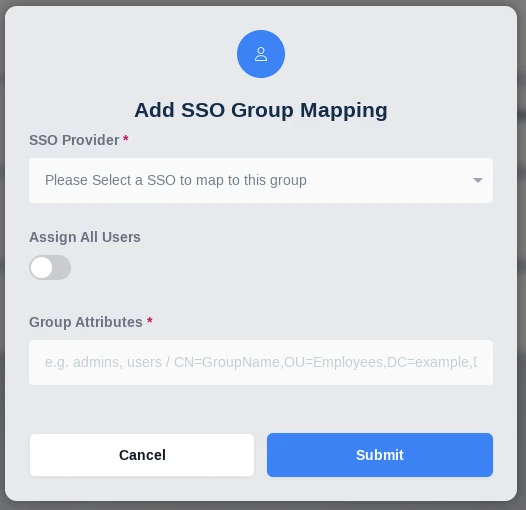
Add SSO Group Mapping
Navigate to the SAML configuration
Change the Group Member Attribute to the corresponding group attribute of the IDP
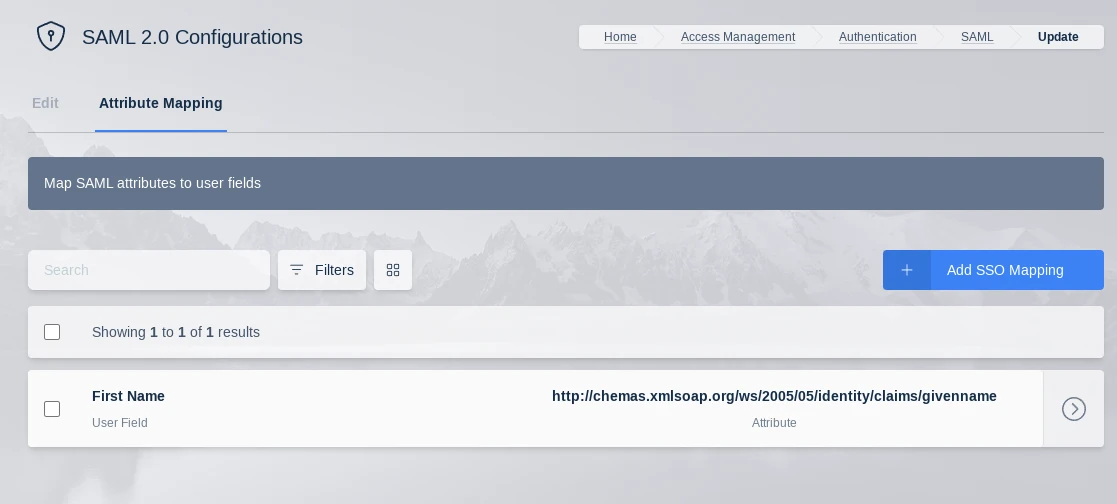
SAML Attribute Mapping
Additional SAML attributes can be passed with the SAML assertion. Administrators can optionally map those attribute values to fields on the Kasm user. See the documentation for your SAML Identity Provider (IdP) for a listing of attributes and how you can pass them to the Service Provider (SP) in the SAML assertion. The following Kasm User fields can be populated with values from SAML attributes.
First Name
Last Name
Phone
Organization
Notes
City
State
Country
Email
Custom Attribute 1
Custom Attribute 2
Custom Attribute 3
SAML Attribute Mapping
Note
Kasm can log all SAML attributes in the assertions during login, this is helpful for determining the attribute names. Add a SAML Attribute Mapping with an attribute name of ‘debug’ and target any user field. The next time a user logs in, all SAML attributes and values will be logged by Kasm.