Using VPNs From Inside Kasm Workspaces Containers
This how to guide will cover configuring a VPN to run from inside a Kasm Workspaces container. This will involve customizing one of the Kasm Workspaces existing docker images to add the VPN software. This works as an alternative to setting up a VPN Sidecar.
Note
Kasm also publishes Workspace images with OpenVPN, Wireguard and Tailscale VPNs built in. This provides a more streamlined workflow for using VPNs from within Workspace container sessions.
See Using a VPN With a Supported Kasm Workspace Container for more details.
This guide will cover two VPN configurations using tailscale and using openVPN.
This guide assumes basic familiarity with the process to build and register new docker images in Kasm Workspaces
Video Tutorial
This video walks through configuring a VPN to run from inside a Kasm Workspaces container.
Running Tailscale Inside a Kasm Workspaces Container
Create the dockerfile and build the image
The example dockerfile uses the
kasmweb/ubuntu-focal-desktopimage as the base with the 1.17.0 tag this image is based on Ubuntu 20.04 LTS. It should be possible to use this guide with other Kasm provided images by adapting the tailscale installation logic in the provided dockerfile.ARG BASE_TAG="1.17.0" FROM kasmweb/ubuntu-focal-desktop:$BASE_TAG USER root ENV HOME /home/kasm-default-profile ENV STARTUPDIR /dockerstartup ENV INST_SCRIPTS $STARTUPDIR/install WORKDIR $HOME ######### Customize Container Here ########### # Install Tailscale RUN curl -fsSL https://pkgs.tailscale.com/stable/ubuntu/focal.gpg | apt-key add - RUN curl -fsSL https://pkgs.tailscale.com/stable/ubuntu/focal.list | tee -a /etc/apt/sources.list.d/tailscale.list RUN apt-get update && \ apt-get install -y tailscale # Sudo is not strictly necessary when using docker exec to start tailscale but will be needed to start tailscale manually RUN apt-get update \ && apt-get install -y sudo \ && echo 'kasm-user ALL=(ALL) NOPASSWD: ALL' >> /etc/sudoers \ && rm -rf /var/lib/apt/list/* ######### End Customizations ########### RUN chown 1000:0 $HOME ENV HOME /home/kasm-user WORKDIR $HOME RUN mkdir -p $HOME && chown -R 1000:0 $HOME USER 1000
The below lines from the dockerfile add the Tailscale Ubuntu Focal repository to apt. Tailscale makes repositories available for many other OSs if using a Kasm image with a different OS look at https://pkgs.tailscale.com/stable/ for the appropriate package repository.
RUN curl -fsSL https://pkgs.tailscale.com/stable/ubuntu/focal.gpg |  apt-key add -
RUN curl -fsSL https://pkgs.tailscale.com/stable/ubuntu/focal.list |  tee -a /etc/apt/sources.list.d/tailscale.list
Build the container with the command:
docker build -t custom:tailscalevpn -f Dockerfile .
Optionally add this image to a docker registry
This allows sharing the image easily to multiple agents
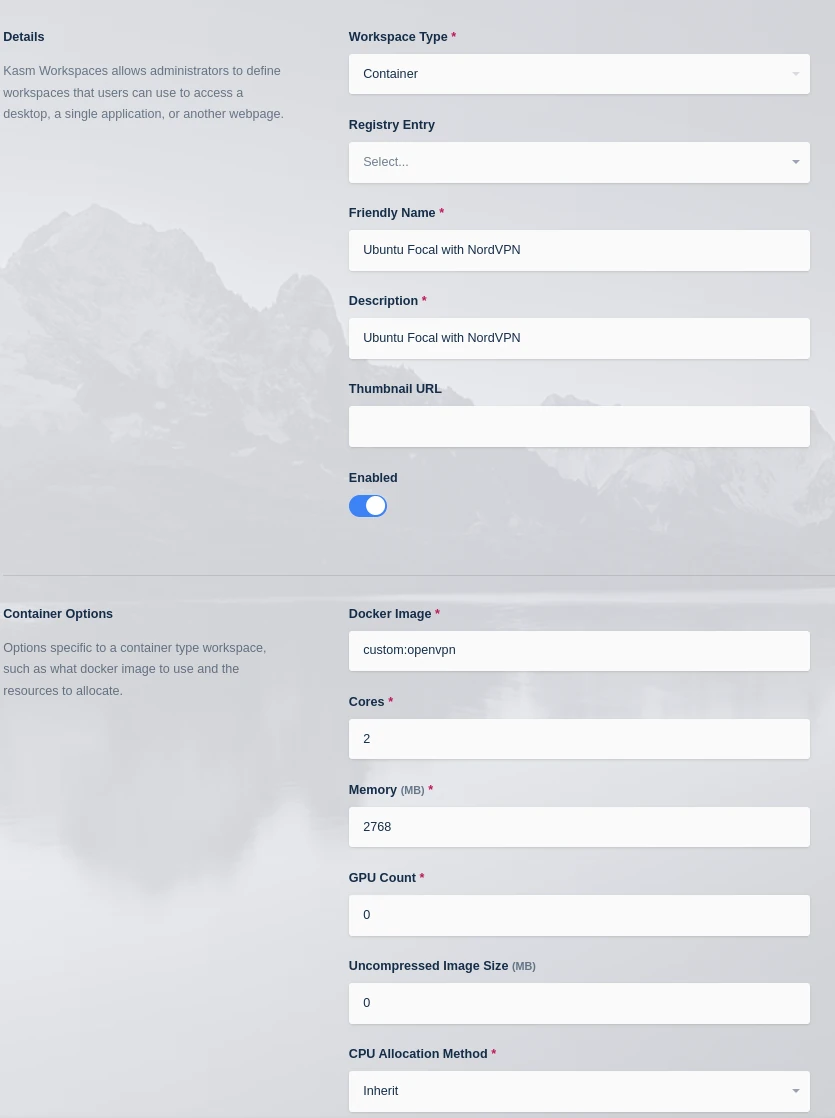
In Kasm create a workspace for the new image
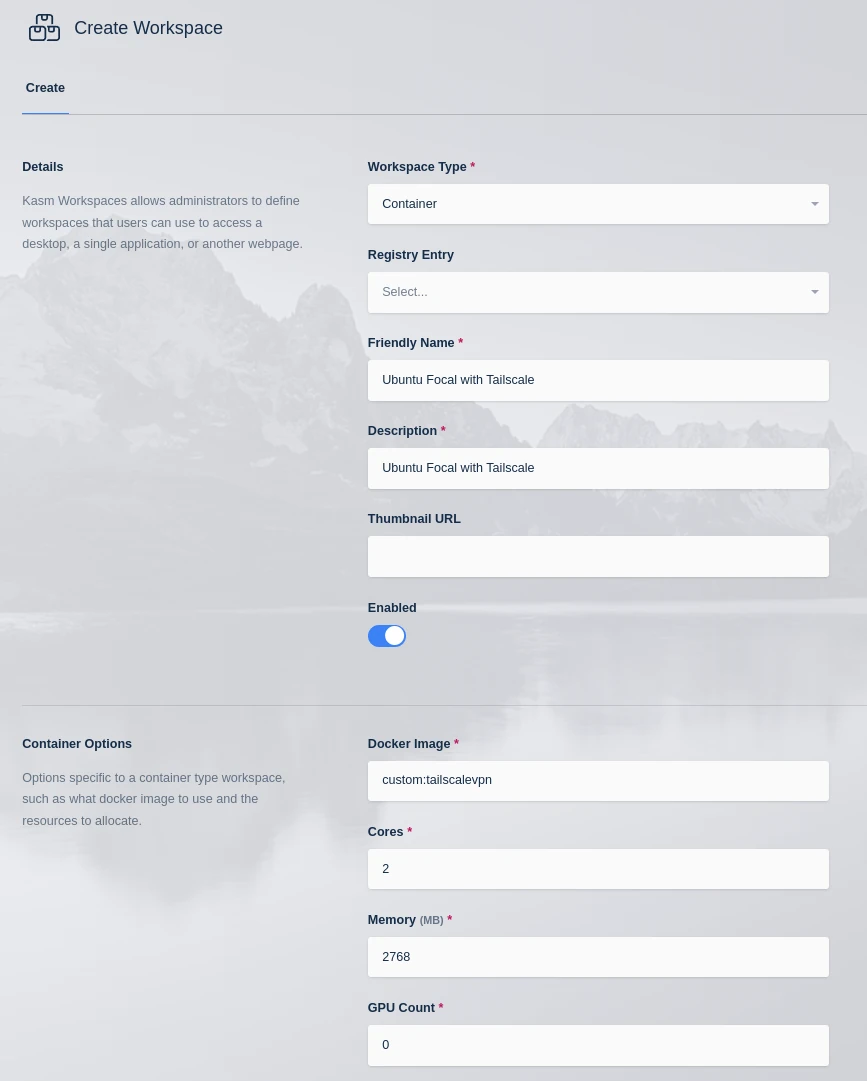
Create the Workspace for Ubuntu Focal with Tailscale
Use the following for the Docker Run Config on the Add Workspace screen
{
  "devices": [
    "dev/net/tun",
    "/dev/net/tun"
  ]
}
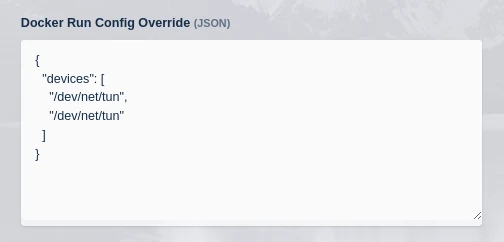
Docker run config details for Ubuntu Focal with Tailscale
Use the following for the Docker Exec Config on the Add Workspace screen
Start tailscaled as root - notice the use of an ephemeral key so that the container can be auto connected to and removed from the tailscale network. These commands can also be put in a custom_startup script instead of using the Docker Exec Config.
{
  "first_launch": {
    "user": "root",
    "privileged": true,
    "cmd": "bash -c 'tailscaled & tailscale up --authkey=tskey-abc123'"
  }
}
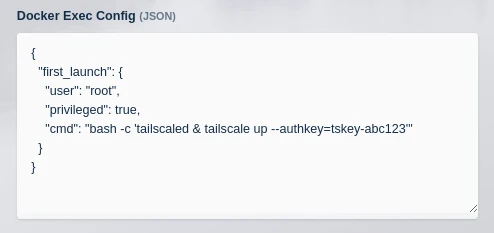
Docker exec config details for Ubuntu Focal with Tailscale
Launch the container and run tailscale status, if everything is correct the status will show the container is connected you the tailscale network.
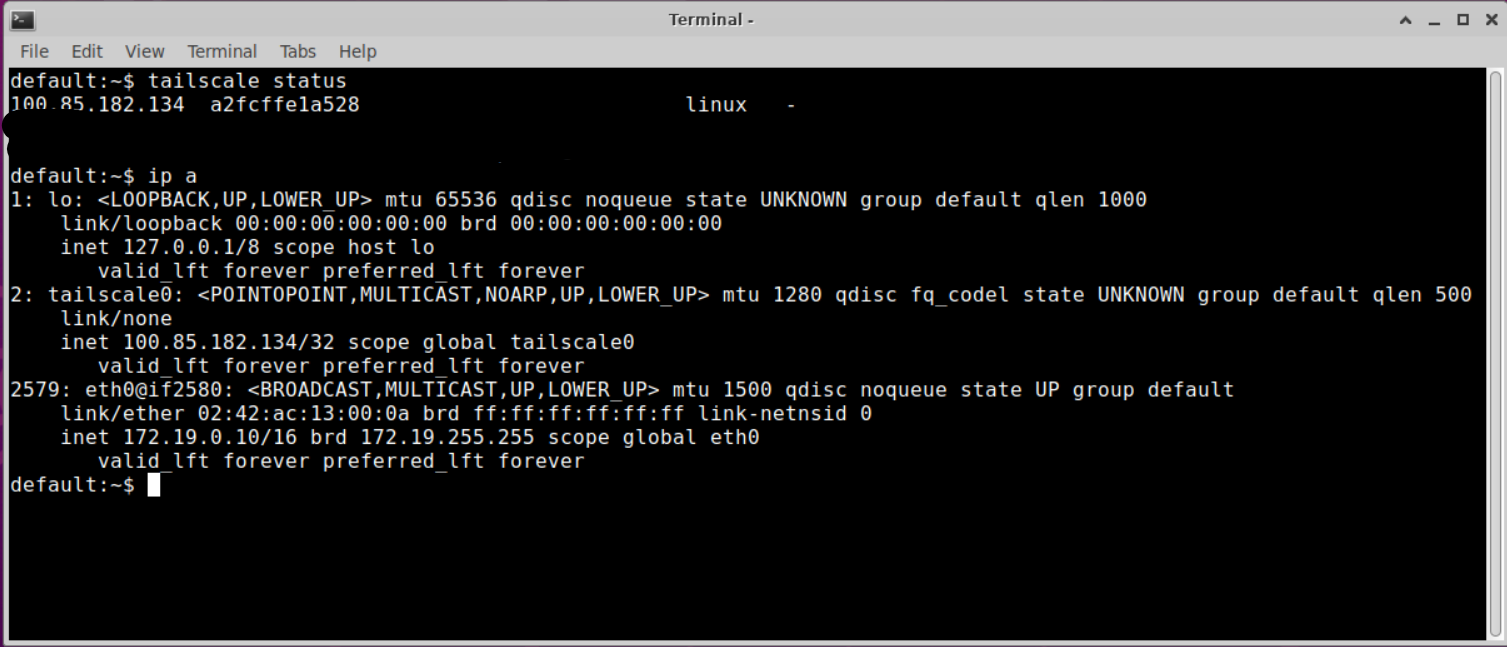
Tailscale running inside the container
Running OpenVPN inside a Kasm Workspaces Container
Create the dockerfile and build the image
The example dockerfile uses the
kasmweb/ubuntu-focal-desktopimage as the base with the 1.17.0 tag this image is based on Ubuntu 20.04 LTS. It should be possible to use this guide with other Kasm provided images by adapting the OpenVPN installation logic in the provided dockerfile.Modifying what connection profiles are used in this example docker file should allow using other VPN services.
ARG BASE_TAG="1.17.0"
FROM kasmweb/ubuntu-focal-desktop:$BASE_TAG
USER root

ENV HOME /home/kasm-default-profile
ENV STARTUPDIR /dockerstartup
ENV INST_SCRIPTS $STARTUPDIR/install
WORKDIR $HOME

######### Customize Container Here ###########

# Install OpenVPN
RUN apt-get update && \
apt-get install -y openvpn

# Copy the NordVPN OpenVPN connection profiles
RUN cd /etc/openvpn && \
wget https://downloads.nordcdn.com/configs/archives/servers/ovpn.zip && \
unzip ovpn.zip && \
rm ovpn.zip

######### End Customizations ###########

RUN chown 1000:0 $HOME
RUN $STARTUPDIR/set_user_permission.sh $HOME

ENV HOME /home/kasm-user
WORKDIR $HOME
RUN mkdir -p $HOME && chown -R 1000:0 $HOME

USER 1000
There are two important components to this dockerfile:
RUN apt-get update && apt-get install -y openvpninstalls the OpenVPN client from the default OS package repository. This can be adapted for other Kasm image OSs.RUN cd /etc/openvpn && wget https://downloads.nordcdn.com/configs/archives/servers/ovpn.zip && unzip ovpn.zip && rm ovpn.zipinstalls the Nord VPN configuration. This can be adapted for other VPN services.Build the container with the command:
docker build -t custom:openvpn -f Dockerfile .
Optionally add this image to a docker registry
This allows sharing the image easily to multiple agents
In Kasm create a workspace for the new image
Create the Workspace for Ubuntu Focal with OpenVPN connecting to NordVPN
Use the following for the Docker Run Config on the Add Workspace screen
The container must run in privileged mode so that the network stack can be modified when the VPN is attempting to connect. The example provides the container with the Nord DNS servers.
{
  "dns": [
    "103.86.98.100",
    "103.86.99.100"
  ],
  "devices": [
    "dev/net/tun",
    "/dev/net/tun"
  ],
  "user": "root",
  "privileged": true
}
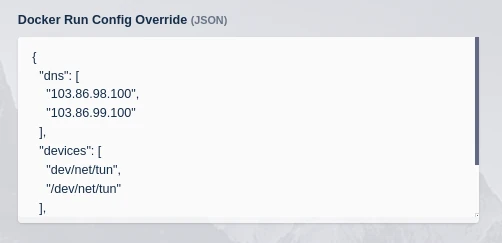
Docker run config details for Ubuntu Focal with OpenVPN connecting to NordVPN
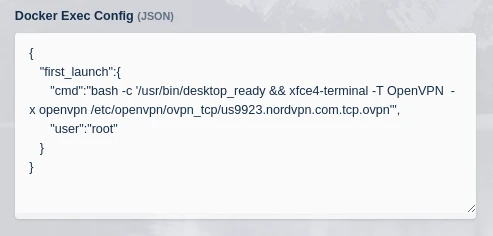
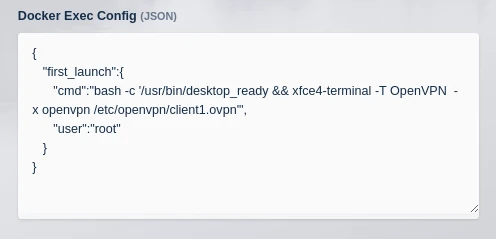
Use the following for the Docker Exec Config on the Add Workspace screen
In the Docker Exec Config tell the container to execute using one of the .ovpn files provided by nord (Each file in the zip extracted in the dockerfile is a NordVPN server in a different location.). Nord VPN provides a tool to look up the recommended server https://nordvpn.com/servers/tools/
{
   "first_launch":{
      "cmd":"bash -c '/usr/bin/desktop_ready && xfce4-terminal -T OpenVPN  -x openvpn /etc/openvpn/ovpn_tcp/us9923.nordvpn.com.tcp.ovpn'",
      "user":"root"
   }
}
The ovpn file from the example for NordVPN can be replaced by the ovpn file provided to connect to the desired endpoint for other VPN providers. If the ovpn file is present on the system building the docker image, for instance in /tmp/client1.ovpn, then add
COPY /tmp/client1.ovpn /etc/openvpn/client1.ovpnto the Dockerfile replacingRUN cd /etc/openvpn && wget https://downloads.nordcdn.com/configs/archives/servers/ovpn.zip && unzip ovpn.zip && rm ovpn.zip. Then modify the Docker Exec accordingly to point to the new connection profile file.
Docker exec config details for Ubuntu Focal with OpenVPN connecting to NordVPN
Launch the container and a terminal will automatically launch to connect to NordVPN.
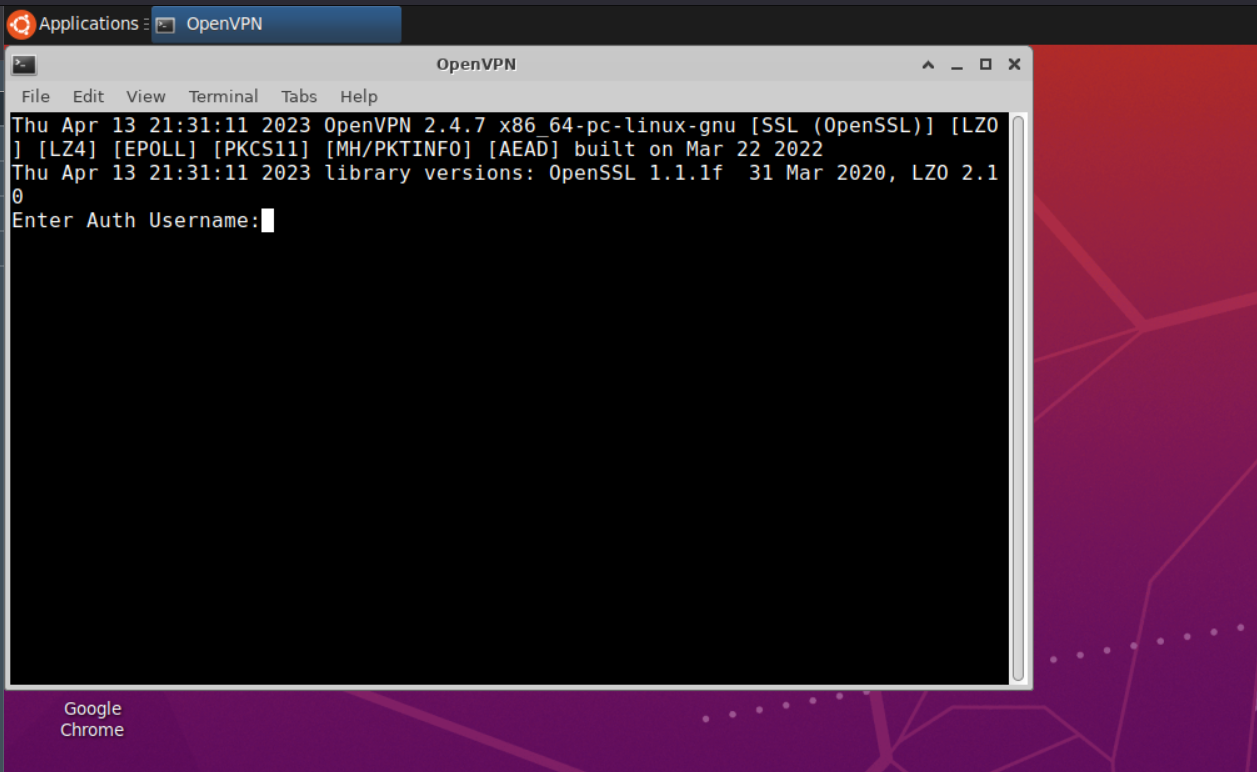
OpenVPN prompting for login credentials to NordVPN
Enter the account login details and connect to NordVPN
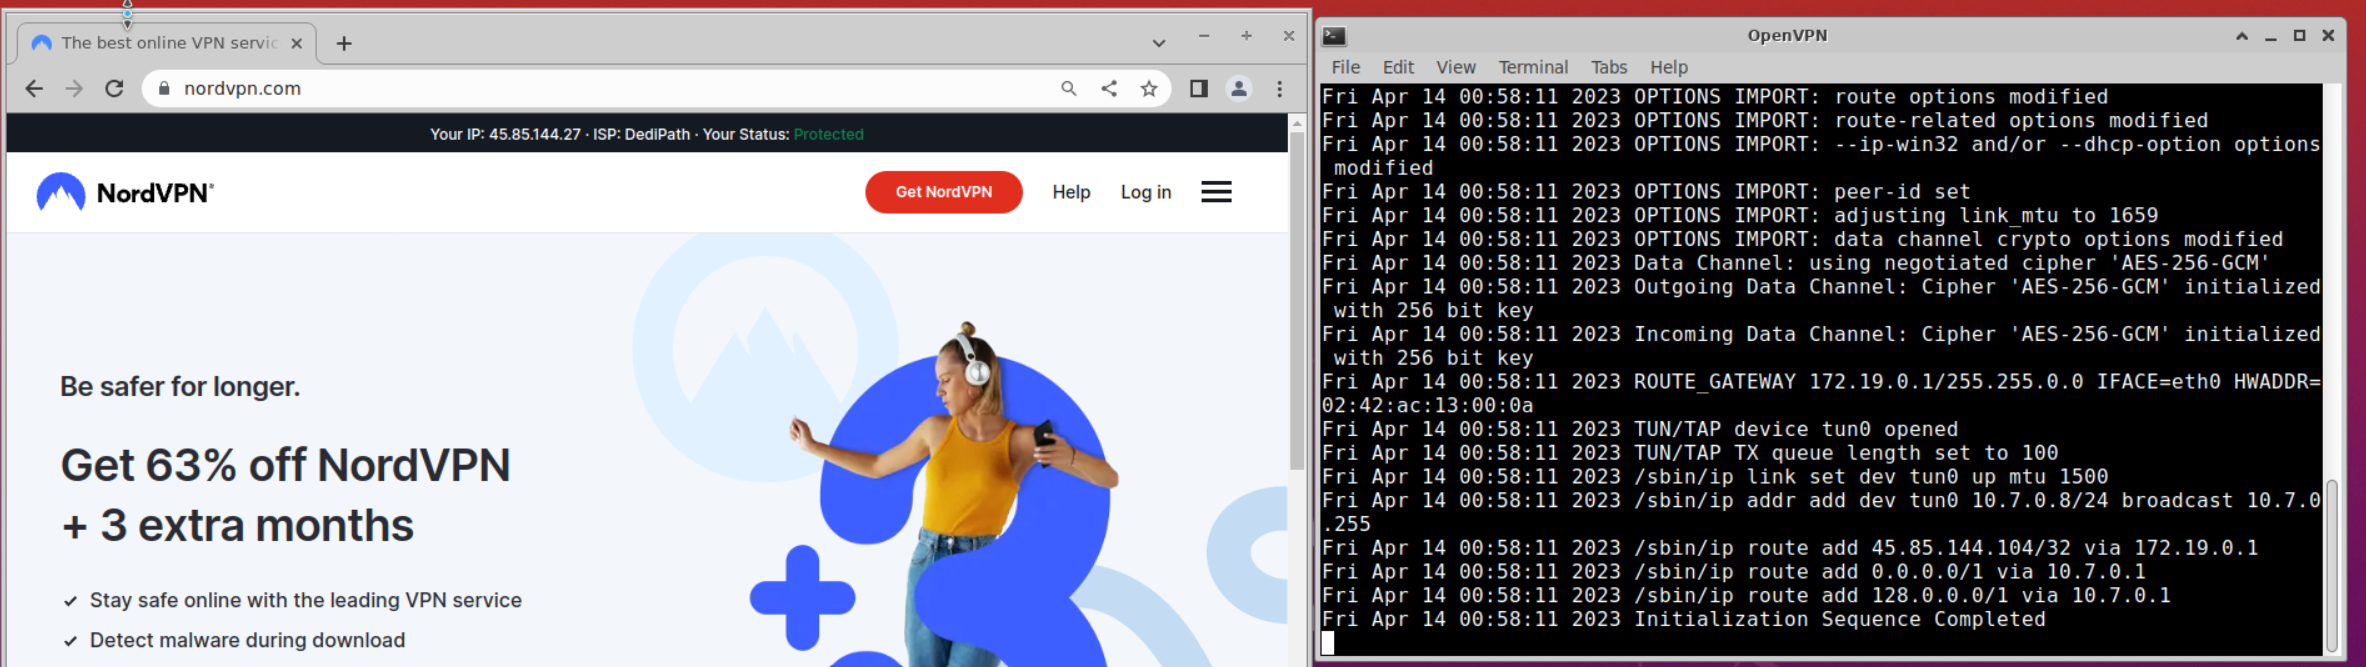
OpenVPN connected to NordVPN running inside the container
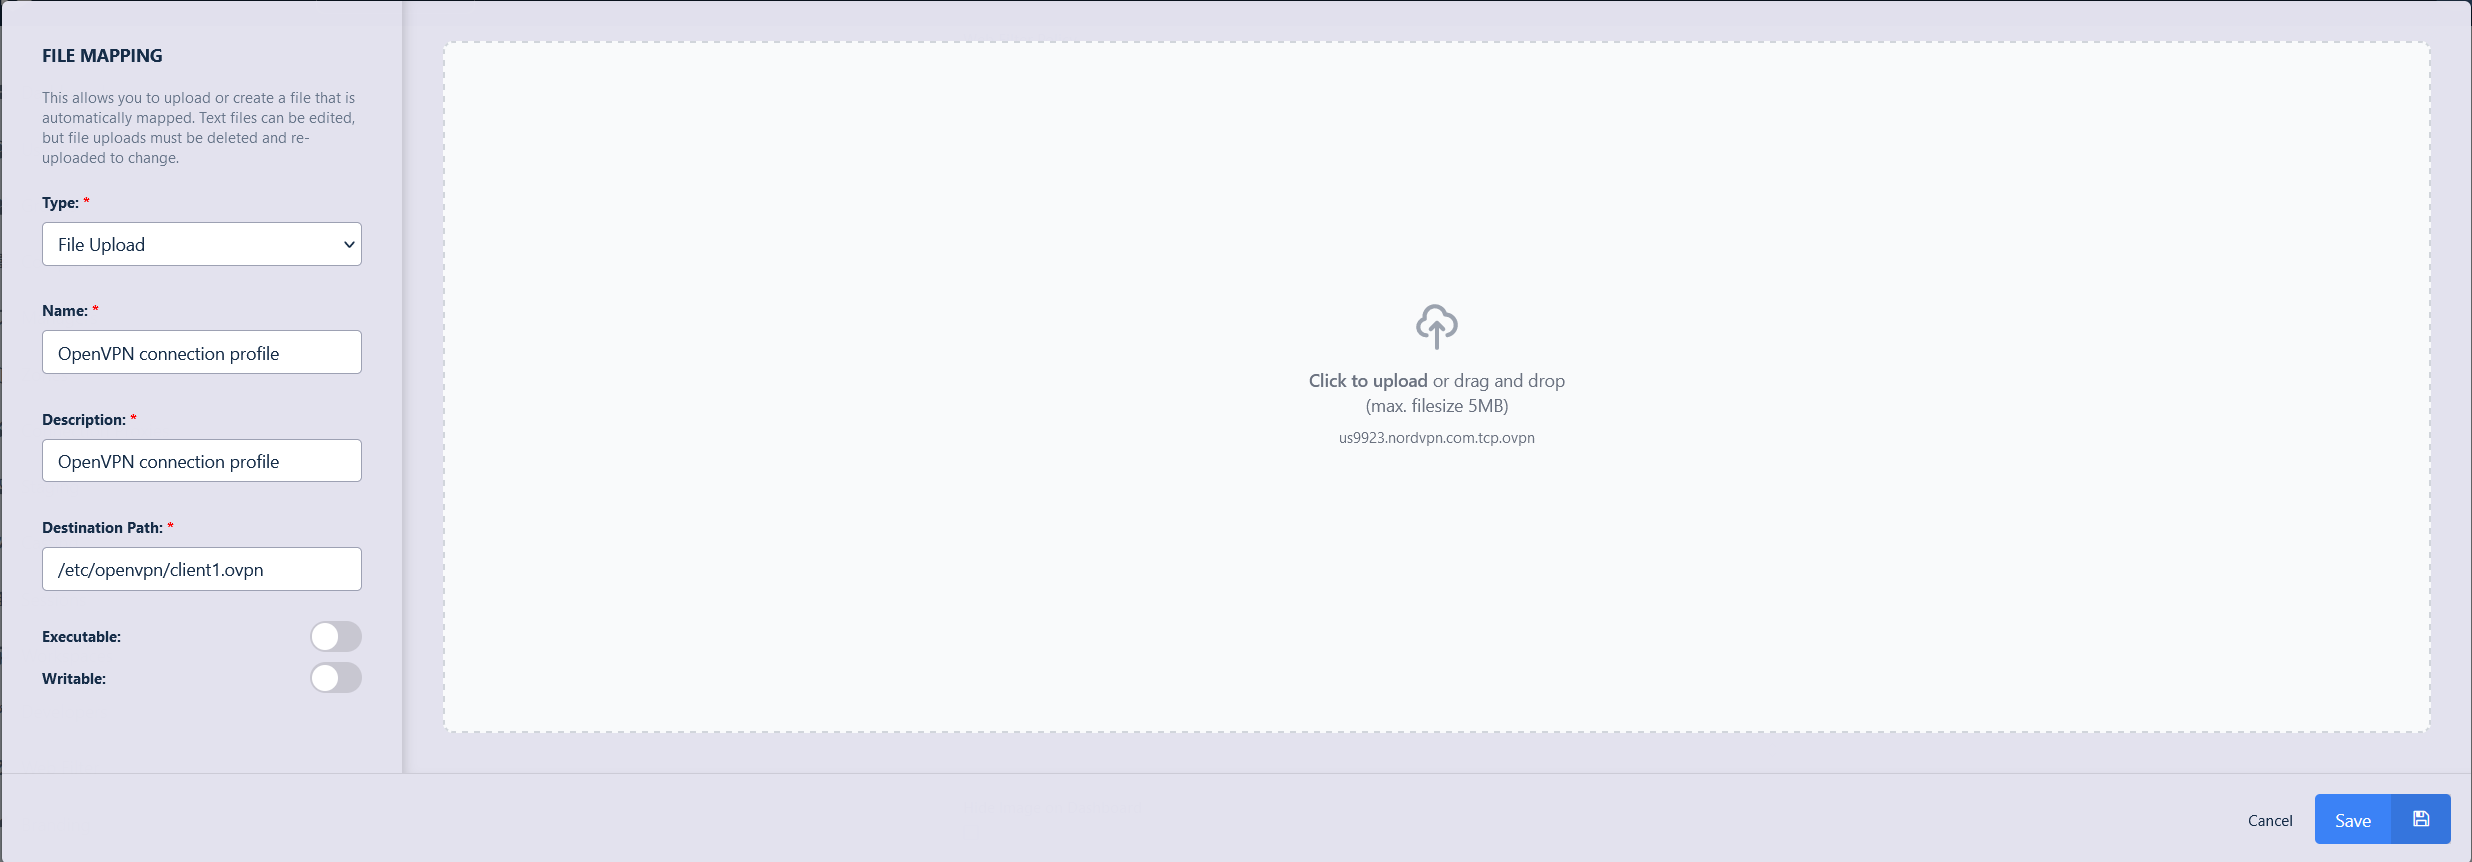
Mapping in the NordVPN connection profiles
Kasm Workspaces 1.13 added support for mapped files for container based workspaces. This feature can be leveraged to easily map in the NordVPN connection profiles rather than downloading them at docker image build time. There are three places that the profile file can be added as a file mapping, for the user, for the group, or for the workspace. When defined for the workspace, the administrator can easily create multiple workspaces that will each connect to a different VPN endpoint. When defined for the group, the administrator can define one workspace image, and have that image connect to the VPN endpoint based on which group the user is part of. Finally, when setting the file mapping by user, the administrator can have each user connect to their own specific VPN endpoint.
When this is done for the user and group levels the file will be mapped into all container based sessions, so it is possible to have multiple OpenVPN enabled images, and have the user/group level file mapping apply to all the images. For non OpenVPN images the file will be mapped in but have no effect as OpenVPN will not be installed.
In the example here this is used to map in NordVPN connection profiles, but this would apply the same to connection profiles from other VPN providers.
Remove the connection profile download from the dockerfile
RUN cd /etc/openvpn && wget https://downloads.nordcdn.com/configs/archives/servers/ovpn.zip && unzip ovpn.zip && rm ovpn.zipcan be removed from the dockerfile used above.Modify the Docker Exec for the image to:
{
   "first_launch":{
      "cmd":"bash -c '/usr/bin/desktop_ready && xfce4-terminal -T OpenVPN  -x openvpn /etc/openvpn/client1.ovpn'",
      "user":"root"
   }
}
Docker exec config details for mapping in an OpenVPN connection profile
Download the NordVPN connection profiles individually from https://nordvpn.com/ovpn/ or as a bundle from https://downloads.nordcdn.com/configs/archives/servers/ovpn.zip.
Follow the process in file mappings to add this file to the image, group or user as /etc/openvpn/client1.ovpn
Add OpenVPN file mapping