Multi Server Installation
In this example, the Kasm services are installed on different servers within the environment. Depending on the desired use case, these servers can be put in separate network enclaves according to your environment and typical security best practices.
Please read through the entire process before getting started.
Troubleshooting info can be found on the Troubleshooting Page
Issues can be reported on the Kasm Workspaces Issues Page
Architecture Roles
The following outlines the Role Service in this architecture. The ports and protocols required for communication are listed to allow for firewalls or filtering devices in your environment
Web App Server(s)
This is the landing point for end users. If end-users access this server from the internet this may be put in a DMZ enclave. This Server includes the following services:
Web Application Web application (kasm_api)
Manager Service (kasm_manager)
Proxy (kasm_proxy)
Ports / Protocols
HTTPS (443)
Database Server
The database server must be accessible by API and Management Services. This Server includes the following services:
Database Service (kasm_db)
Share Database Service (kasm_redis)
Ports / Protocols
POSTGRESQL (5432)
REDIS (6379)
Agent Server(s)
Ports / Protocols
HTTPS (443)
Connection Proxy(s)
Connection proxies are used to broker web native RDP/VNC/SSH and RDP thick client sessions to fixed or autoscaled servers. If this functionality is not needed, this role does not need to be installed. Connection proxies need to be accessible from the WebApp servers and to the destination RDP/VNC/SSH servers. If RDP thick client access is desired then the Connection Proxy role must be internet accessible. This server includes the following services:
Guac Service (kasm_guac)
RDP Gateway Service (kasm_rdp_gateway)
Proxy (kasm_proxy)
Ports / Protocols
HTTPS (443)
RDP (3389)

Multi Server Install
Ports and Protocols
Source |
Destination |
Port |
Notes |
End User |
Web App Server |
443 |
Web Application / UI / API |
End User |
Connection Proxy (rdp-gateway) |
3389 |
RDP Connection |
Web App Server |
Database Server |
5432,6379 |
Database Access (PostgreSQL / Redis ) |
Web App Server |
Agent Server |
443 |
Agent Instructions |
Web App Server |
Connection Proxy (Guac) |
443 |
Proxied RDP Connections to VMs/Hardware |
Web App Server |
VM/Hardware (KasmVNC) |
8443 |
Proxied KasmVNC Connections to VMs/Hardware |
Agent Server |
Management Server |
443 |
Check-in, Request Images, Request Authentication |
Connection Proxy (Guac) |
VM/Hardware RDP Systems |
3389 |
Converts RDP to Web native rendering via Guac |
Connection Proxy (Guac) |
VM/Hardware VNC Systems |
5900 |
Converts VNC to Web native rendering via Guac |
Connection Proxy (Guac) |
VM/Hardware SSH Systems |
22 |
Converts SSH to Web native rendering via Guac |
Connection Proxy (Guac) |
Web App Server |
443 |
RDP Connection Authorization and Status Checks |
Connection Proxy (rdp-gateway) |
VM/Hardware RDP Systems |
3389 |
RDP Connection |
System Requirements
Please review the System Requirements before beginning.
Tip
Kasm provides a Sizing and Deployment Guide to aid in determining hardware specifications for large scale deployments.
Installation Guide
Follow these steps to setup Kasm on separate servers.
Install Database Server Role
Note
The Database can be configured as a standalone database such as an Amazon RDS instance or an existing Postgres instance instead of the Kasm Technologies provided container Standalone remote database.
The following steps will install the Database service on the Database Server.
Download the latest version of Kasm Workspaces to /tmp
Extract the package and execute the installation. Please note the default login credentials produced during the install.
Install Files
Contents |
URL |
SHA256 |
|---|---|---|
Installer Bundle |
https://kasm-static-content.s3.amazonaws.com/kasm_release_1.17.0.7f020d.tar.gz |
22a293ea52b2adb7f3f72a2de8e9be799f443b9da040e066df403478da77f62d |
Contents |
URL |
SHA256 |
|---|---|---|
Services |
https://kasm-static-content.s3.amazonaws.com/kasm_release_service_images_amd64_1.17.0.7f020d.tar.gz |
325229ed79d957d15d42cd80d75c3e59766d8953df49810fa42f09db34660a86 |
Workspaces |
https://kasm-static-content.s3.amazonaws.com/kasm_release_workspace_images_amd64_1.17.0.7f020d.tar.gz |
647a2c9a8113588c592a1d6f8b7017ac747d50f3179394912b3f6b5ab645120b |
Plugin |
https://kasm-static-content.s3.amazonaws.com/kasm_release_plugin_images_amd64_1.17.0.7f020d.tar.gz |
0a8ca7a990663821c8fae356583160cde6517bedbbb920f05a75b91fdc14b3a9 |
Contents |
URL |
SHA256 |
|---|---|---|
Services |
https://kasm-static-content.s3.amazonaws.com/kasm_release_service_images_arm64_1.17.0.7f020d.tar.gz |
01c1936685552836f126b5be8f3480e22b5187fd008b2266f60f2722569fa38d |
Workspaces |
https://kasm-static-content.s3.amazonaws.com/kasm_release_workspace_images_arm64_1.17.0.7f020d.tar.gz |
08df2344b95af83f5d06ddc9f4f3c772e50618b2de7dcedd2016bddfaa9b70c9 |
Plugin |
https://kasm-static-content.s3.amazonaws.com/kasm_release_plugin_images_arm64_1.17.0.7f020d.tar.gz |
37a7645588cde806dda6d84dc13acc13d0fae9ae15bd9669c8229f82f1fde95d |
Note
If you have an Activation Key it can be passed to the installation script and activation will be completed on your behalf as part of the install.
Create a file for the Activation Key e.g. activation_key.txt and paste in the Activation Key you received in you confirmation email.
When running the install.sh use the parameter -a or --activation-key-file so your command might look something like this sudo bash kasm_release/install.sh -a activation_key.txt.
This will not work with an offline air-gapped install, as Kasm Workspaces must contact an activation server to complete licensing your installation.
In a multi server install this option only applies to the database role.
cd /tmp
curl -O https://kasm-static-content.s3.amazonaws.com/kasm_release_1.17.0.7f020d.tar.gz
tar -xf kasm_release_1.17.0.7f020d.tar.gz
sudo bash kasm_release/install.sh --role db --database-user [DATABASE_USERNAME] --database-name [DATABASE_NAME]
cd /tmp
curl -O https://kasm-static-content.s3.amazonaws.com/kasm_release_1.17.0.7f020d.tar.gz
curl -O https://kasm-static-content.s3.amazonaws.com/kasm_release_service_images_amd64_1.17.0.7f020d.tar.gz
curl -O https://kasm-static-content.s3.amazonaws.com/kasm_release_workspace_images_amd64_1.17.0.7f020d.tar.gz
tar -xf kasm_release_1.17.0.7f020d.tar.gz
sudo bash kasm_release/install.sh --role db --database-user [DATABASE_USERNAME] --database-name [DATABASE_NAME] --offline-workspaces /tmp/kasm_release_workspace_images_amd64_1.17.0.7f020d.tar.gz --offline-service /tmp/kasm_release_service_images_amd64_1.17.0.7f020d.tar.gz
cd /tmp
curl -O https://kasm-static-content.s3.amazonaws.com/kasm_release_1.17.0.7f020d.tar.gz
curl -O https://kasm-static-content.s3.amazonaws.com/kasm_release_service_images_arm64_1.17.0.7f020d.tar.gz
curl -O https://kasm-static-content.s3.amazonaws.com/kasm_release_workspace_images_arm64_1.17.0.7f020d.tar.gz
tar -xf kasm_release_1.17.0.7f020d.tar.gz
sudo bash kasm_release/install.sh --role db --database-user [DATABASE_USERNAME] --database-name [DATABASE_NAME] --offline-workspaces /tmp/kasm_release_workspace_images_arm64_1.17.0.7f020d.tar.gz --offline-service /tmp/kasm_release_service_images_arm64_1.17.0.7f020d.tar.gz
Note
The DATABASE_USERNAME and DATABASE_NAME are optional and only required if not using the default kasm/kasmapp settings on an Installation 1.13.0 or newer.
Install Web App Role
The following steps will provision the Web App components on a single server. Repeat these steps on additional servers to add redundancy and scalability. Utilize a single public DNS name with multiple public IPs to have DNS load distribute requests to the Web App Kasm Workspaces server cluster.
For the next steps you need the following information
DATABASE_HOSTNAME : The IP, hostname or FQDN of the Database Server that is resolvable and reachable by the Web App server.
DATABASE_PASSWORD : The database password generated during the installation of the database.
REDIS_PASSWORD : The Redis password generated during the installation of the database.
DATABASE_USERNAME Optional : The database username if using a custom one. This does not need to be included if using a standard Database Server Role installation.
DATABASE_NAME Optional : The database name if using a custom one. This does not need to be included if using a standard Database Server Role installation.
Before continuing, verify this server can access port [DATABASE_HOSTNAME]:5432 and 6379
Note
Use the -z flag to set the Deployment Zone that the components will use. The zone will be created if it does not already exist in the deployment. Unless specified, components will use the “default” zone.
Ex: -z east
Warning
Installation is the only time that a new Deployment Zone can be created.
Download the latest version of Kasm Workspaces to /tmp
Extract the package and run execute the installation
cd /tmp
curl -O https://kasm-static-content.s3.amazonaws.com/kasm_release_1.17.0.7f020d.tar.gz
tar -xf kasm_release_1.17.0.7f020d.tar.gz
sudo bash kasm_release/install.sh --role app --db-hostname [DATABASE_HOSTNAME] --db-password [DATABASE_PASSWORD] --redis-password [REDIS_PASSWORD] --database-user [DATABASE_USERNAME]  --database-name [DATABASE_NAME]
cd /tmp
curl -O https://kasm-static-content.s3.amazonaws.com/kasm_release_1.17.0.7f020d.tar.gz
curl -O https://kasm-static-content.s3.amazonaws.com/kasm_release_service_images_amd64_1.17.0.7f020d.tar.gz
tar -xf kasm_release_1.17.0.7f020d.tar.gz
sudo bash kasm_release/install.sh --role app --offline-service /tmp/kasm_release_service_images_amd64_1.17.0.7f020d.tar.gz --db-hostname [DATABASE_HOSTNAME] --db-password [DATABASE_PASSWORD] --redis-password [REDIS_PASSWORD] --database-user [DATABASE_USERNAME]  --database-name [DATABASE_NAME]
cd /tmp
curl -O https://kasm-static-content.s3.amazonaws.com/kasm_release_1.17.0.7f020d.tar.gz
curl -O https://kasm-static-content.s3.amazonaws.com/kasm_release_service_images_arm64_1.17.0.7f020d.tar.gz
tar -xf kasm_release_1.17.0.7f020d.tar.gz
sudo bash kasm_release/install.sh --role app --offline-service /tmp/kasm_release_service_images_arm64_1.17.0.7f020d.tar.gz --db-hostname [DATABASE_HOSTNAME] --db-password [DATABASE_PASSWORD] --redis-password [REDIS_PASSWORD] --database-user [DATABASE_USERNAME]  --database-name [DATABASE_NAME]
Log into the Web Application running on port 443 at https://<WEBAPP_SERVER>
The Default usernames are admin@kasm.local and user@kasm.local. The passwords will be randomly generated and presented at the end of the install unless the
--admin-passwordor/and--user-passwordare specified.
Default Login Window
Install Agent Server Role(s)
The following steps will install the Agent and Proxy services. Repeat these steps for any additional servers intended to provision end user sessions
For the next steps you need the following information
MANAGER_HOSTNAME : The IP, hostname or FQDN of the Web App Server that is resolvable and reachable by the Agent server.
MANAGER_TOKEN : The manger token generated during the db install. This is used for authentication by the Agent.
AGENT_HOSTNAME : This IP, hostname, or FQDN of this Agent Server that is resolvable and reachable by the Web App Server. This value will be reported by the Agent Service during check in routines and used by other services to communicate with it.
Before continuing, verify this server can access port [MANAGER_HOSTNAME]:443
Download the latest version of Kasm Workspaces to /tmp
Extract the package and execute the installation
cd /tmp
curl -O https://kasm-static-content.s3.amazonaws.com/kasm_release_1.17.0.7f020d.tar.gz
tar -xf kasm_release_1.17.0.7f020d.tar.gz
sudo bash kasm_release/install.sh --role agent --public-hostname [AGENT_HOSTNAME] --manager-hostname [MANAGER_HOSTNAME] --manager-token [MANAGER_TOKEN]
cd /tmp
curl -O https://kasm-static-content.s3.amazonaws.com/kasm_release_1.17.0.7f020d.tar.gz
curl -O https://kasm-static-content.s3.amazonaws.com/kasm_release_service_images_amd64_1.17.0.7f020d.tar.gz
curl -O https://kasm-static-content.s3.amazonaws.com/kasm_release_workspace_images_amd64_1.17.0.7f020d.tar.gz
curl -O https://kasm-static-content.s3.amazonaws.com/kasm_release_plugin_images_amd64_1.17.0.7f020d.tar.gz
tar -xf kasm_release_1.17.0.7f020d.tar.gz
sudo bash kasm_release/install.sh --role agent --offline-workspaces /tmp/kasm_release_workspace_images_amd64_1.17.0.7f020d.tar.gz --offline-service /tmp/kasm_release_service_images_amd64_1.17.0.7f020d.tar.gz --offline-network-plugin /tmp/kasm_release_plugin_images_amd64_1.17.0.7f020d.tar.gz --public-hostname [AGENT_HOSTNAME] --manager-hostname [MANAGER_HOSTNAME] --manager-token [MANAGER_TOKEN]
cd /tmp
curl -O https://kasm-static-content.s3.amazonaws.com/kasm_release_1.17.0.7f020d.tar.gz
curl -O https://kasm-static-content.s3.amazonaws.com/kasm_release_service_images_arm64_1.17.0.7f020d.tar.gz
curl -O https://kasm-static-content.s3.amazonaws.com/kasm_release_workspace_images_arm64_1.17.0.7f020d.tar.gz
curl -O https://kasm-static-content.s3.amazonaws.com/kasm_release_plugin_images_arm64_1.17.0.7f020d.tar.gz
tar -xf kasm_release_1.17.0.7f020d.tar.gz
sudo bash kasm_release/install.sh --role agent --offline-workspaces /tmp/kasm_release_workspace_images_arm64_1.17.0.7f020d.tar.gz --offline-service /tmp/kasm_release_service_images_arm64_1.17.0.7f020d.tar.gz --offline-network-plugin /tmp/kasm_release_plugin_images_arm64_1.17.0.7f020d.tar.gz --public-hostname [AGENT_HOSTNAME] --manager-hostname [MANAGER_HOSTNAME] --manager-token [MANAGER_TOKEN]
Log into the UI as an Administrator, select Infrastructure > Docker Agents and using the arrow menu select edit on the agent you just created. Make sure Enabled is selected and click Save.

Update Agent
(Optional) Install Connection Proxy (Guac/rdp-gateway) Role(s)
The Connection proxy role is required to support connecting to VMs/Hardware via RDP, VNC, or SSH. Workspace supports connecting to pre-exiting machines or auto provisioning them via Cloud Autoscaling. If these services are not needed, this role does not need to be installed.
For the next steps you need the following information
MANAGER_HOSTNAME : The IP, hostname or FQDN of the Web App Server that is resolvable and reachable by the Agent server.
SERVICE_REGISTRATION_TOKEN : The registration token generated during the db install. This is used to register the Connection Proxy with the system. The Service Registration Token (AKA Component Registration Token) can also be found in the global settings in the Kasm Admin UI.
CONNECTION_PROXY_HOSTNAME : This IP, hostname, or FQDN of this Connection Proxy Server that is resolvable and reachable by the Web App Server. This value will be reported by the Connection Proxy Server during registration and used by other services to communicate with it.
Before continuing, verify this server can access port [MANAGER_HOSTNAME]:443
Download the latest version of Kasm Workspaces to /tmp
Extract the package and execute the installation
cd /tmp
curl -O https://kasm-static-content.s3.amazonaws.com/kasm_release_1.17.0.7f020d.tar.gz
tar -xf kasm_release_1.17.0.7f020d.tar.gz
sudo bash kasm_release/install.sh --role guac --api-hostname [MANAGER_HOSTNAME] --public-hostname [CONNECTION_PROXY_HOSTNAME] --registration-token [SERVICE_REGISTRATION_TOKEN]
cd /tmp
curl -O https://kasm-static-content.s3.amazonaws.com/kasm_release_1.17.0.7f020d.tar.gz
curl -O https://kasm-static-content.s3.amazonaws.com/kasm_release_service_images_amd64_1.17.0.7f020d.tar.gz
tar -xf kasm_release_1.17.0.7f020d.tar.gz
sudo bash kasm_release/install.sh --role guac --offline-service /tmp/kasm_release_service_images_amd64_1.17.0.7f020d.tar.gz --api-hostname [MANAGER_HOSTNAME] --public-hostname [CONNECTION_PROXY_HOSTNAME] --registration-token [SERVICE_REGISTRATION_TOKEN]
cd /tmp
curl -O https://kasm-static-content.s3.amazonaws.com/kasm_release_1.17.0.7f020d.tar.gz
curl -O https://kasm-static-content.s3.amazonaws.com/kasm_release_service_images_arm64_1.17.0.7f020d.tar.gz
tar -xf kasm_release_1.17.0.7f020d.tar.gz
sudo bash kasm_release/install.sh --role guac --offline-service /tmp/kasm_release_service_images_arm64_1.17.0.7f020d.tar.gz --api-hostname [MANAGER_HOSTNAME] --public-hostname [CONNECTION_PROXY_HOSTNAME] --registration-token [SERVICE_REGISTRATION_TOKEN]
Dedicated Kasm Proxy (optional)
In a standard Multi Server installation the Proxy service that handles pointing the client to the correct agent server
is included with the Web App role along with all other client UI and routing. The need might arise to have many proxies spread out over different geographic locations while keeping a single web endpoint serving static web content with the Proxy serving the Kasm Workspaces session. To facilitate this there is a proxy installation role that installs and configures a web proxy to direct end users to the correct agent to spin up a Kasm Workspaces session.
Proxy Overview
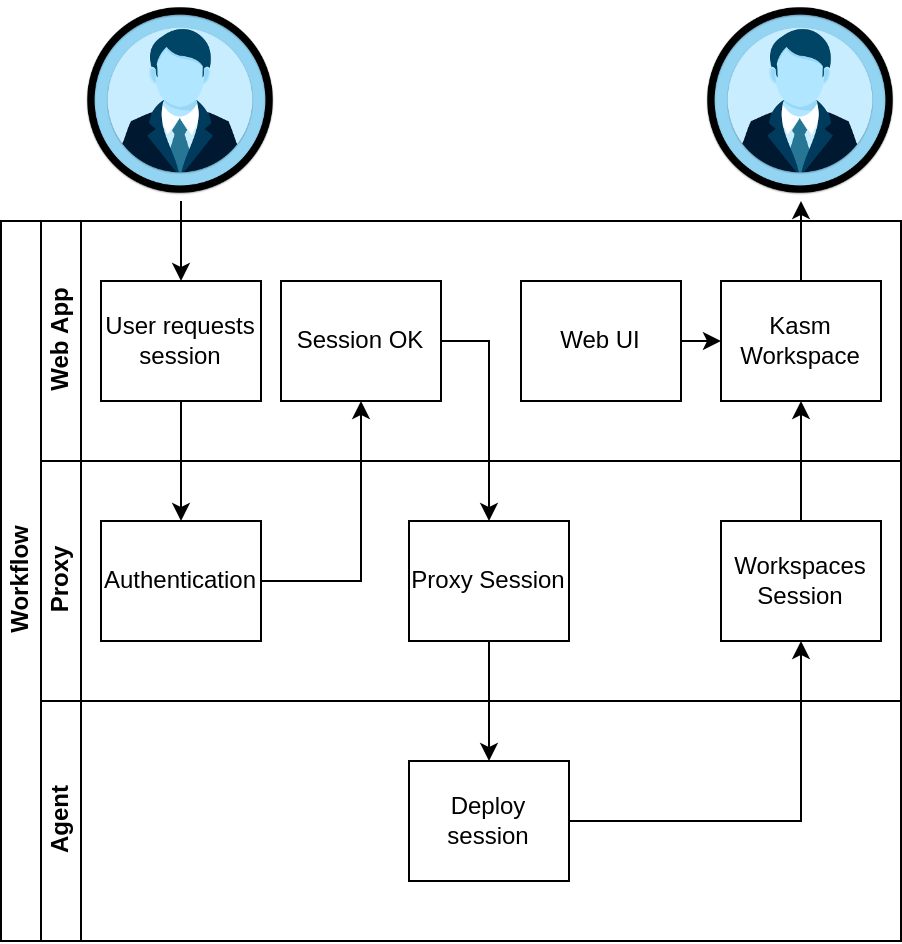
Proxy Workflow
The user follows the same workflow when launching a workspace and on the backend we direct them to the correct Agent/s, but unlike a standard Multi Server Deployment the Workspaces Session is routed through the Proxy in the user’s geographic region to reduce latency.
Proxy installation
Note
This guide assumes you have a running Multi Server deployment of Kasm Workspaces and have a basic understanding of domain/SSL management. For help with SSL certificates please see Custom Certificates
The following steps can be followed to install the proxy role to a server:
Ensure the Proxy server has a domain name pointed to it and a legitimate SSL certificate.
Download the latest version of Kasm Workspaces to /tmp.
Extract the package and execute the installation.
Post install, configure Kasm Workspaces via the Web UI to use the new Proxy.
In this example we assume the proxy domain is proxy.example.com and the Web App hosting the API server is located at workspaces.example.com.
Proxy Server installation
Note
It is important that the agents in your Multi Server installation can be accessed by this Proxy server deployment ensure connectivity to the Agent server from the Proxy server before installation.
In order to install the proxy role you will need to know the URL for the Web App server you plan to have your users connect from. This endpoint will be pointed to for authentication and is needed to enforce strict CORS policies.
cd /tmp
curl -O https://kasm-static-content.s3.amazonaws.com/kasm_release_1.17.0.7f020d.tar.gz
tar -xf kasm_release*.tar.gz
sudo bash kasm_release/install.sh --role proxy --api-hostname workspaces.kasmweb.com
Post Install Configuration
With the proxy running you will need to login to your Kasm Workspaces installation as an administrator and navigate to Admin->Settings->Global->Authentication->Kasm Auth Domain. Change this setting to example.com and click Save.
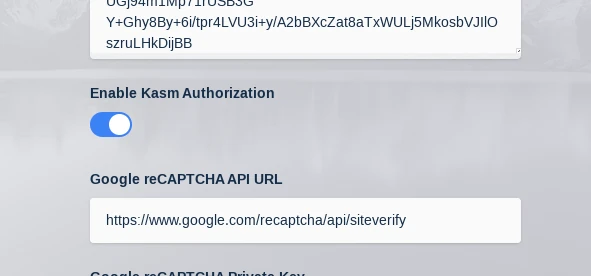
Set Auth Domain
Next navigate to Admin->Infrastructure->Zones->Click the arrow next to the zone you want to point to the Proxy->Edit Set Proxy Hostname to proxy.example.com
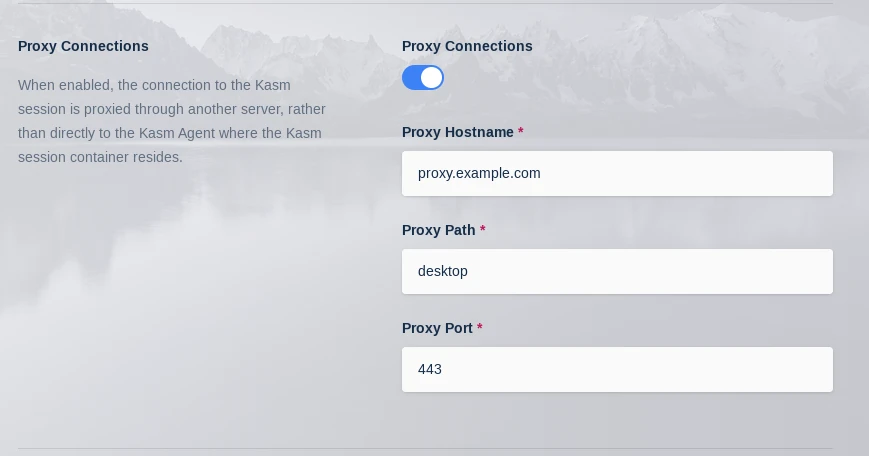
Set Proxy Host
While in this menu also set Upstream Auth Address to workspaces.example.com
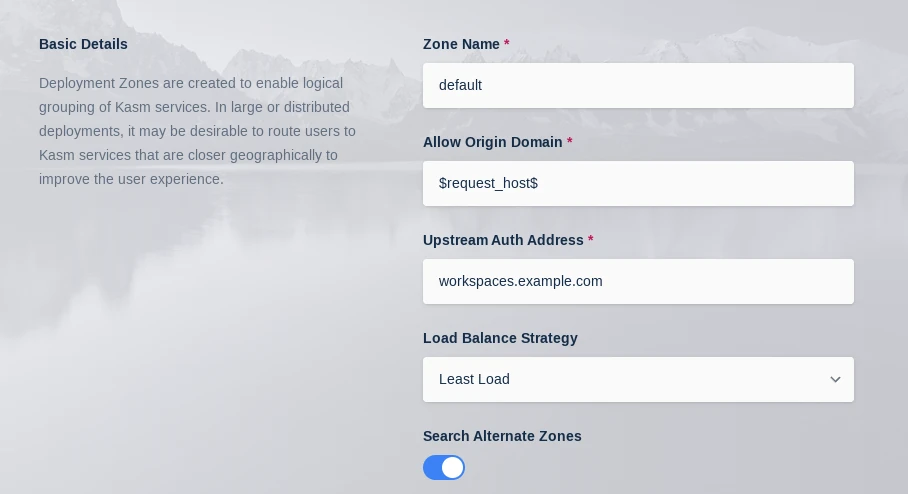
Set Upstream Auth
With these setting changed we need to restart the API server container on the Web App server/s:
sudo docker restart kasm_api
When a user now deploys a Kasm Workspace their streaming session will be served up by this new external proxy instead of the default one deployed with the Web App role.
Install troubleshooting
The install.sh script creates a log file as it runs, this file is removed upon completion of a successful installation. However, if something does go wrong the logfile will be available from the directory the install.sh script was executed from in the format kasm_install_${TIMESTAMP}.log. This file will be important for diagnosing the error that caused the installation to fail and will be requested when submitting a support ticket with Kasm Technologies.